Connected to Chamberlain but cannot control

Sure. First of all thanks for the quick reply. Please let me know the steps

This will involve the use of spare remote in the way that Garadget will “press” the button on it.
Please review some of the posts I linked in my last response for more information. If your extra remote is not mentioned/picture in any of those posts, please send the pictures and I’ll point out the hook up points.

Please find the attached 2 photos. I have 2 spare remotes. Black is the new remote which is currently being used (I have 2 and hence one is spare).Blue is the old remote. 1st photo is front of both spare remotes and 2nd photo is back(having model etc)

Thanks for pics.
Please pick one remote that works with your current opener which you’re willing to use for interfacing.
It will have to be opened to expose the PCB inside. If there are no screws accessible through the battery compartment, typically there’s widening in the seam that can be used to prop the case open.

Please post the pictures of both sides of the PCB and I’ll point out the connection points for the Garadget’s control wire.

2 questions: will I be able to use the remote that I use to interface as a normal remote OR will it be useless?
2nd Question: is their a soldering etc required? I don’t have any soldering device

Please find the front and back of the remote’s PCB. This remote currently can open and close the garage door I am trying Garadget with

Hook up points:

You can test the hookup by electrically shorting the suggested points with the conductor and verifying that the door opener responds accordingly.

Answering your questions:

  • The wireless remote will have to remain connected to Garadget, which means it will not be available for the regular use
  • Yes, the control wires will have to be soldered in

The options:

  • you can ask a friend or family member with the soldering iron to help you with the connection
  • you can mail me the remote and I’ll solder the wires for you
  • if this all sounds like too much of the project, it is understandable if you decide to return Garadget for full refund

Please let me know what you’ve decided.

Ok good news. I was able to hook ( photo attached) . Will it be ok if I use the crocodile hooks and use duck tape?

1 Like

This should work as the proof-of-concept but I’m a bit concerned with this setup taking into account the vibration from door opener. The crocodiles may snap off or touch the surrounding elements and we’ll get a serving of 3 Pops.

What is serving of 3 pops?

That’s the reference to the nutrition facts sheet in your picture :wink:
Does everything work as expected with this setup so far?

Ha ha. I got the idea. I don’t think anybody in my circle would have a soldering machine. If I just send you the PCB will you be able to solder 2 wires? Please advise along with address. Should I use normal usps?

Also on second thoughts. The SW4(current switch controlling the door) side has lots of points. But SW1 is very clear. If I can first program SW1 to control the door and then connect garadget? What do you think?

Yes, you can mail the PCB and I’ll attach the wires. Also, yes USPS will work just fine for this, though for the price of shipping you can get a soldering iron and after watching few youtube videos you should have the satisfaction of conquering it.

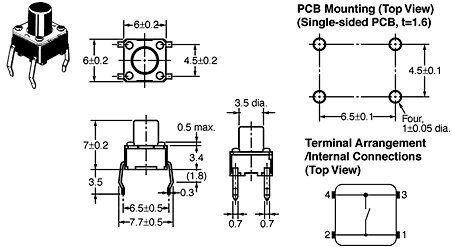
And yes you can program another button and use it instead of SW4. You can attach to either side of the button - the leads across are connected:

OK thanks. The eBay link you provided has all the things I need to complete the wiring right? It has 30W solder gun and solder wire too. I will solder the hard-copper wire (that came with the package) to the remote-PCB.

I my post I picked the least expensive iron with shipping from USA with the minimum kit that should suffice for your project. In the description they say that it comes with 2 soldering wires and a stand. It’s nice to have rosin, wick, brush etc, but If you don’t plan on picking up a new hobby, I’d say there is no need to buy anything else at this time.

I got a soldering gun. But the hard-copper wire I got with Garadget is really think for that tiny soldering spot on the remote. Can you recommend a thinner wire (which could be easy to solder to the tiny point)? As we are not working with high volts I would think a normal thin single-strand wire should also do the work right? Any links?
Thanks in advance

Great! Any wire you can salvage from some old cord will do for this purpose.

ok thanks for the quick reply. I will try one of the old RCA cables :slight_smile:

Just the word of advice: don’t keep the iron on PCB more than 2-3 seconds. If the joint is not working out to your liking, give it a chance to chill and try again. If the traces start to peel because of PCB overheating it’s going to be hard to fix.

I’d also do a knot with the wire through the hole in the corner of the PCB to prevent casualties on the board if somebody yanks on the other end of the wire.